Monday, 10 February 2014

Please Vote For Me...

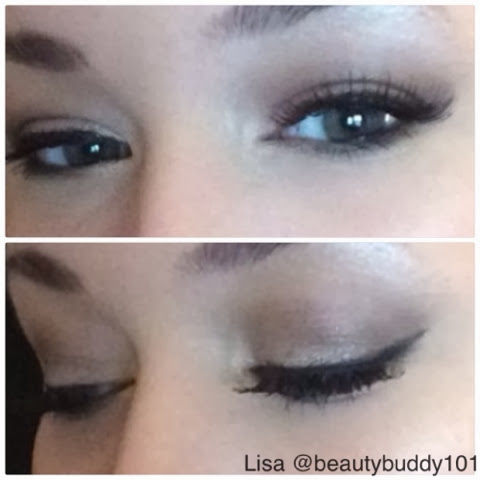
Hey everyone, i entered a competition over on @nextroutestyle blog. The conpetition was to enter an eye make up look. I decided to do a simple look using Urban Decay's Naked 3 and Naked Basic's palettes. I would be forever greatful if you guy could pop over to http://next-route-style.blogspot.co.uk/2014/01/eye-make-up-competition.html 
and comment Lisa-bblogger. 
Thanks guys :)
Lisa xoxo
My finished simple eye look

Thursday, 30 January 2014

HD Brows...

In the last year or so I have became slightly obsessive about my eyebrows. I even find myself looking at loads of different peoples eyebrows when I am out ect too! For the past little while I have just been using MAC eyeshadow in Charcoal Brown on my eyebrows (Tanya Burr on youtube swears by this) but then I started talking to a lovely lady Sarah on twitter (@SCCosmetics1 go follow her!!)

Sarah asked me if I had ever tried out HD Brows before, which I hadn't. I had always thought HD Brows were like these big black heavy brows you see people wearing, I'm sorry if you like them but they most definitely are not my cup off tea. But I was very surprised to find this wasn't the case at all. Sarah had offered to do my brows HD style free of charge so I could test them out but with me living in Scotland and Sarah living just outside London it wasn't possible to get down to meet her. So instead she said she would send me up a couple of HD products to try out myself at home and all I can say is why have I not tried these before! Sarah sent me an HD eye & brow palette in the shade Foxy and a tube of Brow Beater which is a clear gel that sets to keep your brows in perfect position all day long and it does exactly that.

My brows have always been a little sparse and thin and while using MAC charcoal brown to define them was good using the HD foxy palette is amazing, the colours are very buildable, and should be used with a light hand. A little of this product goes a long way which mean it will last you that little bit longer. As you can see from a previous make up look I done my brows look ok, But now looking at a picture where I have done them using the HD foxy palette they are still the same except more defined and the colour lasted the whole day too thanks to the brow beater I applied over the top :)!!

MAC charcoal brown on the left & HD foxy palette on the right
I honestly can't rave enough about these products, they are a make up bag must have!

 
Let me know what you think of HD brows :)
 
Also if you are in the St Albans, Hertfordshire area be sure to go get some HD brows and other treatments done by Sarah! A list on all treatments and how to contact her are linked HERE on her website.
 
Lisa xoxo


Thursday, 16 January 2014

UK Birchbox for January 2014...

I got this months Birchbox through the post a couple of days ago. I am happy with the most of the products I received and can't wait to use/try them but I was disappointed that they send me a repeat item from my August Birchbox and there was a product I really don't like in there too which I have gotten in a box before but I cant remember if it was Birchbox or another one of the subscription boxes I get.
 
Here's what was in January 2014 UK Birchbox, the theme for this month is Tiny Tweaks..
 
First thing I saw was a product Birchbox had already told us every one was getting.  It was a mini sized Benefit Porefessional (7.5ml). I love this product!! I use it every single day under my make up and even on days where I decide not to wear any at all. It reduces the size of my pores and it makes my skin silky smooth. This holds my foundation pretty well too and doesn't make my skin any oilier than it already gets without any product ect on it.
 
Second there was Derlarom Acquaconfort Mask, this is a smooth hydrating mask to nourish skin and restore suppleness and vitality. I can't wait to try this mask out, I think I might replace my usual Sunday face mask with this one to try it out. It says to apply it to clean skin, leave on for 5-10 mins then wipe off.
 
Third there was Rodial Glamtox Night. This is a super-hydrating night time gel moisturiser is mean tot smooth out your complexion and plump fine lines. I can't wait to try this out once my current night time moisturiser is finished. The only thing I am not to keen on is the scent, it's very floral but it does calm down after 5 mins.
 
Next I saw Premae Anatomy Nutrients Instant Renewal Body Oil. This is meant to moisturise, tone and detoxify your skin. It is a natural and allergy tested body oil. You apply this to clean skin after a bath or shower to nourish and rehydrate your skin. I used this yesterday and my skin was so smooth after using it, I applied it to damp skin.
 
The fifth thing I seen I was disappointed with. Its the Philip Kingsley Elasticizer. This hair mask strengthens, nourishes and prevents breakage. You work it through damp hair, let it sit for 20 mins then shampoo and condition your hair as usual. I tried this product the last time I received it and I didn't like it at all. It made my scalp very itchy and after I had shampooed and conditioned my hair as normal I didn't notice any difference to my hair either?
 
Then lastly in the box was something I received in my august box and I wasn't very happy with it the first time round, never mind a second time. It is the Birchbox Eye Mask. Its a gel filled mask that is designed to cool the eye area and decrease the puffiness around the eye. I have quite sensitive eyes so when I put stuff like this over them they water like crazy and sting like mad because it's cold.
 
Over all I rate this box 7 out of 10.
 
  
If you want to join Birchbox click here and then click Sign Up.
Its £12.95 per month (that's including p&p).
 
Lisa xxx


Wednesday, 15 January 2014

Natural Date Night Make Up Look...

This is my natural date night make up look, I hope you like it!

 
To start off I prime my face all over with Benefit porefessional and leave that set for a minute or two. Taking my Chanel vitalumiere aqua foundation in the shade 10 beige, I put a little drop on the back of my hand and blend it into my face using a flat foundation brush. A little goes quite far with this foundation and it smells amazing.
For my concealer lately I have been using my BareMinerals concealer in the shade light 2, I love this it covers my under eye circles, any redness I have and any little blemishes I have with no problem. It has a very light but creamy texture so I do recommend setting it with a powder. I use Rimmel stay matte powder in translucent.
For bronzer I used the Bourjois bronzing powder in shade 51. I use it on the underpart of my cheekbones (where you contour), temples, forehead hairline, under my jaw line and a little on my nose. It gives my face a nice little bronzed glow and isn't orangey at all. 
I used Benefits rockateur blush on the apples off my cheeks and bringing it back slightly too. On top of that I used a little bit of BareMinerals ready luminiser in shade the daydream, its a beautiful light pink shimmer.
If you are like me though a light shimmer isn't enough so on my cheekbones I used Benefits watts up highlighter too for that extra little bit of glow :). I also used this as my under-brow highlight once I had filled in my brows.
Onto the eyes, I start off by priming my eyes with Urban Decay primer potion.
Then taking satin taupe by Mac I blend this all over my eyelid and also take a little under my eye along my bottom lash line.
I then use a little charcoal brown on a 217 brush both by Mac & blend that into my crease.
Using Mac phloof! I very slightly highlight the inner corners of my eyes.
I use a long-lasting black waterproof eyeliner by Daniel Sandler to line my top water line. I can't fault this liner one bit, it's my holy grail eyeliner I love it!!!
for mascara I use Maybelline the falsies in black, this mascara is by far one of the best I have ever bought!
I then fill in my eyebrows using benefit browzing in the shade light. I don't use the wax that comes in that kit though, only the powder then I set my brows with a brown brow gel from Maybelline.
 
for my lips I like to keep it simple so I used a BareMinerals marvellous moxie lipgloss in the shade Rebel. These lip-gloss's are amazing, they are moisturising, long lasting and they are not sticky. They also have the best smell and taste too lol!
To finish off I set everything with Urban Decay oil control setting spray and i'm good to go :)!!
 
I hope you enjoyed this make up look, let me know what you think...
 
Lisa xxx


First Mini Debenhams and Boots Haul of January...

So I was trying to be really good and not buy any beauty related items this month as I got a lot of items I have been wanting for ages for my Christmas and my birthday which is on December 14th. But that didn't happen lol, I lasted 12 days without buying something (think that may be a record for me though lol) then I went on to Debenhams website and had a little look which ended up in me making a little purchase of a new foundation :)!! I purchased the Chanel Vitalumiere Aqua Foundation in the shade 10 beige. I have been looking at this foundation for months and I just decided I had to have it. It is the best foundation I think I have ever tried (the most expensive too) It hasn't disappointed me one bit, the colour is perfect, it sits nice on my skin & it has a lovely scent to it as well. This foundation was a little pricey at £32 but so far to me its worth the money.
 
 
Next I went onto Boots website and I picked up the Bourjois Bronzing Powder (looks like chocolate chunks) in the shade 51 for £6.99. I have seen so many people rave about this bronzer and I don't know why I haven't ever picked one up before now. It's brilliant, not shimmery and not orange. It gives off a nice light bronzy colour. I then picked up Maybelline The Mega Plush mascara in black for £7.99, I like this mascara for possibly everyday use but to me Maybelline The Falsies mascara is way better for volume and length! And last but not least I picked up the new Maybelline Baby Skin pore erasing primer for £7.99. I used it for the first time today and I really like it, makes your skin feel the same as it does when you have used Benefits Porefessional. It does what it says it does and erases your pores and makes your skin feel so silky and smooth.
 
 
Lisa :) xx


Monday, 30 December 2013

My go-to 15 minute make-up look...

This make up look is my go to look if i am running late to meet the girls for a night out or if my plans of a cosy night in change to dinner with friends or even a night out lol! This make up literally takes me 15mins to do, you can take more time and add more colours to your look but this is my quick, in a rush, go with all outfits make up look :)!

First off i prime my skin using Benefit porefessional, i then use either Estée Lauder Double Wear Foundation in 1W2 Sand or MAC Studio Fix Fluid foundation in NC20 depending on how my skin is that evening. I find using my Sigma F80 flat top kabuki brush great for blending in these 2 foundations, it works with each one perfectly! After blending out my foundation i conceal under my eyes, around my nose and any other little bits i want to hide with my MAC pro longwear concealer in NC20 and blend that in using my ring finger in a light tapping motion. Then to set everything i use Rimmel stay matte powder in translucent, i use a large fluffy face brush for this. The bronzer i use every single day is BareMinerals bronzer in the shade, skinny dip. Its a nice natural bronze colour with very little shimmer, don't be fooled by how dark it looks in the pan! I like using Benefit's rockateur blush on my cheeks, then a little MAC mineralise skinfinish in soft & gentle on my cheekbones, cupids bow, my nose and chin.


  1. On my eyes i start off by using a Maybelline colour tattoo in the shade 05 eternal gold all over my eye lid. Then taking my Urban Decay naked palette, i take the colour half baked onto a flat shader brush and pat it on over the Maybelline colour tattoo. Taking a MAC 217 brush and the colour smog i work this into my outer 'V' and then whats left on my brush lightly through my crease to blend any harsh lines away. I line my eyes using a thin liner brush and MAC gel liner in blacktrack. For mascara i use my all time favourite mascara ever, Maybelline the falsies flared in black. Also for my brows i fill them in using MAC charcoal brown on a MAC 266 small angled brush then highlight my brow bone slightly using MAC mineralised skinfinish in soft & gentle.


For my lips it usually just depends on what i'm doing with my hair, if my hair is up i sometimes go for a bold lip but most of the time i'll just wear a pinky coloured gloss on my lips, i'm loving NYX Cosmetics butter gloss in strawberry parfait just now which is a nice neutral pink gloss.

Hope you like this 15 minute make up look and find it helpful, let me know what you think :)


Lisa :) xx
Follow me on Twitter: @beautybuddy101 

Monday, 23 December 2013

Red Carpet Manicure, The Best Home Gel Nail System...

I don't know about any of you guys but I personally can't have my nails without any sort of polish on them. The thought of having bare nails actually makes me feel slightly anxious (weird I know)! So every two weeks I was spending £35 on getting my nails done until I came across Red Carpet Manicure. The kit I bought cost me £83.99 from salon services (usually £89.99 for customers that don't have a salon services trade card) You can also purchase the kit from Red Carpet Manicure website www.redcarpetmanicure.co.uk
The Red Carpet Pro kit I purchased included:
Professional LED Light (with timer function)
PURIFY Pre & Post Application Cleanser (59ml)
PREP Max Adhesion Sanitizer (9ml)
STRUCTURE Base Coat Gel (9ml)
BRILLIANCE Seal & Shine Top Coat Gel (9ml)
ERASE Gel Nail Polish Remover (59ml)
REVITALIZE Nourishing Cuticle Oil
LED Gel Polish (9ml) in You Like Me, You Really Like Me


This kit has to be the quickest and easiest way to give yourself a gel manicure ever. It takes me roughly 30-45 minutes to give myself a perfect salon finished gel manicure in the comfort of my own home.  Here is the steps I take to make sure I achieve a perfect manicure.

1- Shape your nails, being qualified in Spa Manicure and Spa Pedicure this takes me very little time but for some one that is a beginner it can take a little extra time, it used to take me at least half an hour to get my nails the way I wanted, but as they say practice makes perfect :)! But please remember, when filing your natural nails only use the nail file in one direction, filing your nails like you are sawing a piece of wood will badly damage your nails and make them weak and brittle. I then check my cuticle's to see if they need pushed back and tidied up slightly. It isn't really necessary but I like to do it. But again please be very careful doing this you don't want to damage your cuticles because that will make them red and very sore.

2- I buff my nails with a white buffing block (69p form salon services) gently I only really want to remove the shine from my natural nail and smooth the nail plate out ever so slightly. I then take a lint free pad and put some Purify Pre & Post Application Cleanser on to it and wipe each nail just to make sure I have got rid off all dust from filing and buffing and to make sure all traces of oil ect are removed for the nail plate as this will help the gel stick to your nails a lot better.


3- To start your gel manicure you need to start off with a thin layer of Structure Base Coat over your nails and cure it under the lamp until the light goes off (approx. 30-45seconds). This will protect your nails from being stained from the colours of the polishes, just like you would use a base coat when using nail polish. 

4- choose your colour, depending in what colour you choose depends on how many coats you will need to do. I have found that some colours only need 2 coats where others sometimes need 3 or 4 coats. Put a thin layer of polish on each nail and cure it in-between coats, if you put the polish on to thick it'll likely come off easily which isn't what you want.

5- Once you have got your polish to the colour you want on your nails it is now time for the Brilliance Seal & Shine Top Coat. Again put a thin layer all over the nail and cure in the LED lamp. Don't be shocked if your nails appear to glow a little in the lamp, you can't see it when there finished.

6- Once your nails are cured, take another lint free wipe with some Purify Pre & Post Application Cleanser and wipe all over each nail to remove the tacky layer left and to reveal a shiny and perfect gel manicure :)!

7- Finish your manicure off with a little drop off Revitalize Nourishing Cuticle Oil and massage into each finger. This stuff smells gorgeous!!

When you are ready to remove your gel manicure it is very simple. All you need is the red carpet manicure Mini Removal Kit -£2.95 from the Red Carpet Manicure Website- a buffing block and Erase Gel Nail Polish Remover.
First Buff your nails to remove the shiny top coat. Then stick a Foam Soak onto a Foil Sheet (from the mini removal kit) and soak the foam pad in some Erase gel nail polish remover. Place the soaked foam pad onto the buffed nail and wrap the top of your finger up with the foil the foam pad is stuck too. Leave all 10 foils on your fingers (or toes) for about 10-15 minutes then check to see if the polish comes off easily, use an wooden orange stick to remove the polish and if there is any still stuck on your nail, simply pop the foil and foam pad back onto the finger until the polish comes off easily. Please don't scrape your nails, this can do a lot of damage to your nails and cause ridges in your nails and also make them very weak too.

I really recommend the red carpet manicure if you are like me and like to have perfect nails all the time but don't have the time to sit in a salon for an hour and 15 minutes every 2 weeks, being a busy mum to a 4 year daughter. the polishes themselves cost £12.95 each but they last a long time. I also do my daughter's nails, she likes to have her nails done but with normal polish it last's a day and I'm always a little scared it comes off in her mouth but I don't have to worry about this when I put gel polish onto her nails, they stay un-chipped and perfect for up to 2 weeks (Just an FYI... I don't force my daughter to have her nails done, she asks to have them done as and when she wants them done)!
Below are some of the nails I have done using only Red Carpet Manicure.